Setting up a Raspberry Pi as an XBMC Device using RaspBMC
Equipment needed:
- Computer (Windows, Mac or Linux)
- Raspberry Pi (512MB Version Recommended)
- Raspberry Pi Case (Recommended)
- USB Keyboard (for temporary setup use with the Raspberry Pi)
- Raspberry Pi Power Supply or Micro-USB connector lead with USB Mains Socket.
- Wired Internet Connection for Pi with Cat5/Cat6 cable
- USB US Card Reader (If your computer doesn’t already have an SD Card reader)
- Fast SD Card (32GB Class10 Recommended)
It is best to use the fastest SD card you can (10 is recommended) and use a high capacity card if funds allow, I have gone for a Sandisk Extreme 32GB Type 10.
IMPORTANT NOTE: Eject/Unplug any other USB storage devices to make sure you will not format an incorrect drive by accident.
Connect the SD Card to you computer BEFORE you follow the steps in the appropriate Part 1. If, like me, your computer doesn’t have an SD Card slot a USB SD Card reader will be necessary for this.
In the instructions that follow [RETURN] means hit the "ENTER" or "RETURN" key, don't type the word "[RETURN]".
Part 1 (If installing RaspBMC from Windows)
The RaspBMC distribution is created and maintained by Sam Nazarko and you can download a Windows installer for the latest version from The RaspBMC Website.
Launch the RaspBMC installer application and select the SD card reader from the devices list and click install.
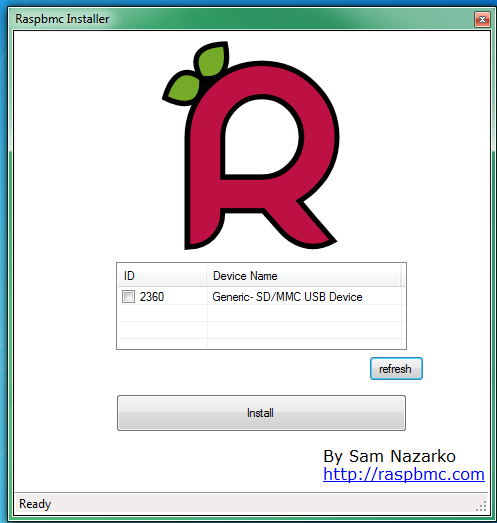
It will take less than a minute while the installer downloads and restores the image to the SD card.
Now eject the SD card from your computer and go to Part 2.
Part 1 (If installing RaspBMC from OSX or Linux)
Launch a shell prompt, this can be done on Mac OSX by opening the Terminal app. On Linux use the Linux command line or open an X11 Terminal emulator.
Once you have a shell prompt open, you should proceed to download the installer by typing in the following commands:
Linux:
wget http://svn.stmlabs.com/svn/raspbmc/testing/installers/python/install.py [RETURN]
chmod +x install.py [RETURN]
OSX:
curl -O http://svn.stmlabs.com/svn/raspbmc/testing/installers/python/install.py [RETURN]
chmod +x install.py [RETURN]
Now we need to run the installation script with root privileges as we will be writing to an SD card. In some distributions you can do this by prefixing the command with sudo (OSX for example), whereas in some you will need to su root. You should consult your OS documentation for more help on this matter. But in the case of a standard OSX or Debian install, one would run:
sudo python install.py [RETURN]
You will be greeted with a screen similar to the one below. You are now using the installer. Simply follow the instructions and you should be fine.
In the following example ‘disk5s1’ can be identified as the 32GB SD Card due to the size and default OS.
IMPORTANT NOTE: It is CRITICAL that you choose the correct intended device to install to. If you get this wrong you risk permanently overwriting the data or operating system on a different device or volume with no chance of recovery.
Type the IDENTIFIER name for your intended destination SD Card and hit [RETURN]
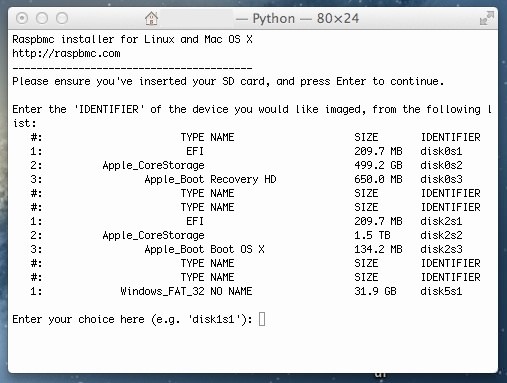
For our example we would type:
disk5s1 [RETURN]
You will get a message:
It is your own responsibility to ensure there is no data loss! Please backup your system before imaging
You should also ensure you agree with the Raspbmc License Agreement
Are you sure you want to install Raspbmc to '/dev/disk5s1' and accept the license agreement? [y/N]
Type:
Y [RETURN]
You will get a message something similar to:
Downloading, please be patient...
Downloaded 6.49 of 6.49 MiB (100.00%)
Unmounting the drive in preparation for writing...
Unmount of all volumes on disk5 was successful
Please wait while Raspbmc is installed to your SD card...
(This may take some time and no progress will be reported until it has finished.)
0+1172 records in
0+1172 records out
76800000 bytes transferred in 5.925598 secs (12960717 bytes/sec)
Installation complete.
Finalising SD card, please wait...
Volume failed to eject
.
Raspbmc is now ready to finish setup on your Pi, please insert the SD card with an active internet connection. If you want to install to a USB device, mount the fat partition and create a file called 'usb'
Take note of the last part of this message if you wish to install RaspBMC to a USB device instead on the SD Card.
Now eject the SD card from your computer and go to Part 2.
Part 2 – The REAL Install!
From this point forward I’ll refer to the Raspberry Pi device as the RPi.
With the RPi powered off connect the following peripherals/cables:
- A Screen via HDMI (I use an HDMI to DVI Adaptor as my screen doesn’t have an HDMI port)
- A USB Keyboard (necessary later for setting RaspBMC settings & preferences)
- A Network cable with internet access. The other end should be connected to you Router, Switch or other other Internet source
Place your newly prepped SD Card in the RPi.
Power on the RPi by connecting the Micro-USB power lead and the latest version of RaspBMC will be downloaded and installed.
You’ll get a message telling you that it will take some time as the relevant files are downloaded from the Internet.
This is by far the best way to install RaspBMC on the RPi as it will use the very latest builds of the software and will take full advantage of the space available on your install media. Using a pre-built image will have older software and be limited to the size of media the image was originally created on.
When all is done the RPi will reboot into RaspBMC using the default ‘Confluence’ Skin.
The best way to add features and make changes to you RPi is to establish an SSH connection from your computer to your RPi. See Part 3 for that.
Part 3 – Establish an SSH connection to the RPi
How to SSH into the RPi to configure or add features.
We now have the basic, default RaspBMC install on our RPi, but there are plenty of add-ons we can install give us additional settings/features. Not all of these are available from the default list of add-ons, which come from what is called a repository, so we need a way to add extra repositories to get these extra features and enhancements on to the RPi.
The best/most effective method in my opinion is to SSH connect to the device from your computer.
Finding you RPi's IP Address
In order to connect to the RPi via SSH we need to know it’s IP address.
On the RPi use the connected USB keyboard to navigate to
SYSTEM → System Info → Network.
Use the cursor keys and the [RETURN] key for this. The ESC key can be used to got back a step if you need to. Under the Network Tab your will see information about your RPi's Network connection, including the IP address, make a note of it.
Open a Terminal connection
To create an SSH connection between your computer and the RPi you need to open a Shell prompt or Terminal connection from your computer. The method is slightly different depending on the operating system of your computer.
On OSX
Open the Terminal app.
On Linux
Use the same method you did in the first paragraph of Part 1 (If installing RaspBMC from OSX or Linux).
On Windows
Windows doesn't have a Terminal program as part of the operating system so we need to download and install one. I strongly recommend the excellent free program called PuTTY, available from the author Here.
User Name and Password
The default user name and password for your RPi are:
username: pi
password: raspberry
When we’re all done you can change these, but for now we’ll go with the default settings.
SSH Command line syntax
The correct syntax for establishing an SSH connection between two devices is username@target-ip-address or username@target-domain.
We'll now need the IP address of your RPi you previously made a note of.
At the shell prompt type:
ssh pi@yourraspberrypi-ip-address [RETURN]
for example, if your RaspberryPi’s IP address was 192.168.0.20 you would type:-
ssh pi@192.168.0.20 [RETURN]
The very first time you do this you will get a message:
The authenticity of host '192.168.1.27 (192.168.1.27)' can't be established.
RSA key fingerprint is 3d:c1:1b:77:b4:3a:32:07:52:1c:b7:f1:d7:ae:72:29.
Are you sure you want to continue connecting (yes/no)?
Type:
yes [RETURN]
You will be prompted for the password, type:
raspberry [RETURN]
Some '1st time connection' Locale, Language & Time Zone configuration
The very first time you SSH into your RPi you will also be asked to configure some settings to do with your location and keyboard layout.
Use the cursor UP and DOWN keys to change the highlighted option and the SPACE BAR to make a selection followed by [RETURN] when the appropriate option is highlighted.
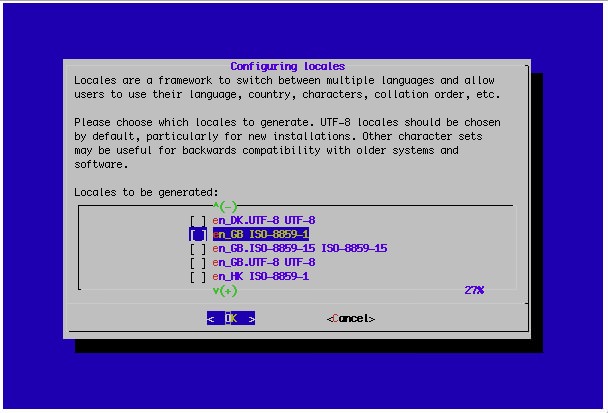
Locales for Language and Keyboard Layout
I’ve never been totally sure which locale(s) to select here, but being from the UK I went for en_GB ISO-8859-1. My assumption here was that en = English and GB = Great Britain and my choice was the first one in that list with those criteria.
If I were from the USA I’d have gone for en_US 8859-1 instead.
I only install the one.
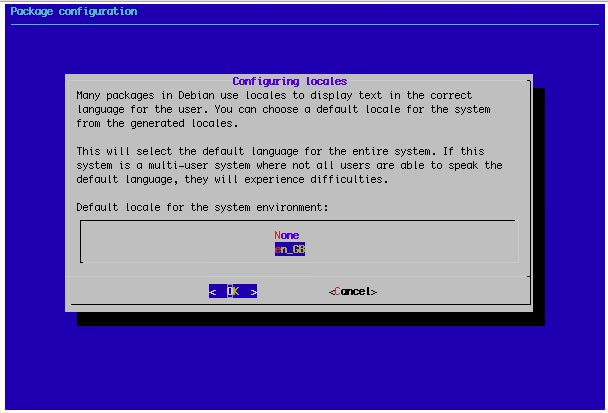
Default Locale
Next you need to confirm the default locale in order to set the default system environment language. With only 1 installed it was an easy choice for me.
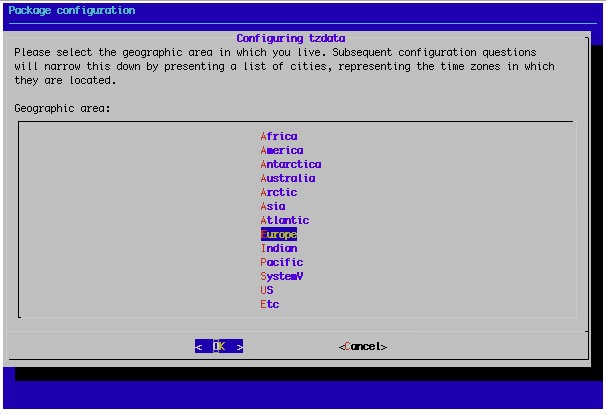
Time Zone data (tzdata) Geographic Area
Select your geographic area.
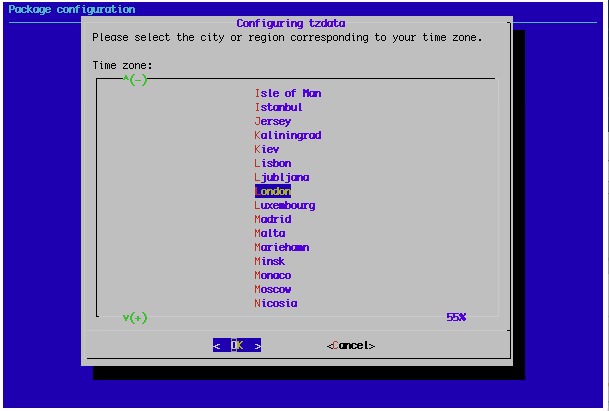
Time Zone data (tzdata) City######
Select your city in order to work out your specific Time Zone settings.
All Done
You won't have to go through those location options again. You’ll be reminded that you still need to enter your locales in XBMC (RaspBMC is based on XBMC), and then you’ll be at the command prompt:-
pi@raspbmc:~$
With any future SSH connections to the RPi when you type:
ssh pi@yourraspberrypi-ip-address [RETURN]
You'll be prompted for the password and then you'll be straight in at that command prompt, ready to install some extra features and options.